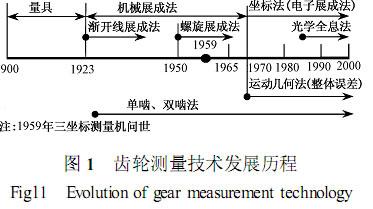
1 Origin and history The application of gears has a long history, and the scientific research of gears began in the 17th century. M1Camus discovered the node principle of gear transmission. In 1765, LlEuler introduced the involute tooth profile into the gear. After more than 100 years, Fellows et al. applied the method to efficiently The involute gear is produced, and the involute gear has been widely used. Actual gears always have errors due to manufacturing and installation reasons. This error has a direct impact on the accuracy and dynamics of the drive train, especially vibration and noise. Therefore, how to characterize, measure, analyze, utilize and control gear errors has been the subject of constant exploration. The basis of gear measurement is the theory of gear precision [1]. The development of gear measurement technology is based on the development of gear precision theory. The development of gear precision theory essentially reflects the deepening of people's understanding of gear errors. So far, the gear accuracy theory has experienced the development of gear error geometry theory, gear error kinematics theory and gear error dynamics theory. Among them, the theory of gear error dynamics is still in the process of exploration. The first theory regards the gear as a pure geometry, and considers the gear to be a combination of some spatial and curved surfaces. Any surface can be described by the coordinates of the points in the three-dimensional space. The deviation of the position of the point on the actual surface from the theoretical position is the gear error. The second theory regards the gear as a rigid body. It considers that the gear is not only a geometry but also a transmission. It is considered that the gear error affects the transmission characteristics through the meshing direction during the meshing motion. Therefore, the meshing motion error reflects the tooth surface error information. . The third theory regards the gear as an elastic body, which reshapes the tooth profile and introduces the error “intentionally†to compensate the elastic deformation after the gear teeth are loaded, so as to obtain the best dynamic performance, thus forming the gear dynamic precision. New concept. The development of gear precision theory has led to the continuous enrichment and update of gear precision standards, such as transmission error and the introduction of design tooth profile. In turn, the development of gear measurement technology has provided technical support for the application of gear precision theory and the implementation of gear standards. The development of gear measurement technology and its instruments has a history of nearly one hundred years. In this short development process, there are six iconic things: 1) In 1923, the German company Zeiss developed the first instrument called “Tooth Surface Tester†in the world. It is actually a mechanically developed universal involute tester. Based on this improvement, Zeiss launched a practical instrument in 1925 and put it on the market. The instrument's length reference uses an optical glass ruler with a line spacing of 1 μm. The advent of the instrument marks the beginning of precision measurement of gears. The V G450, which is widely used in China, is an improved version of the instrument. 2) At the beginning of the 1950s, the emergence of the mechanical exhibition-type universal spiral line inspection instrument marked the reality that the overall control of gear quality became a reality. 3) In 1965, the United Kingdom developed a grating-type single-bit instrument, which marked the possibility of measuring the dynamic performance of the gear with high precision. 4) In 1970, the overall gear error measurement technology developed by Chinese engineers, mainly Huang Huangnian, marked the beginning of the measurement of gears by the motion geometry method. 5) In 1970, the American Fellows exhibited the Microlog 50 at the Chicago Expo, marking the beginning of the CNC Gear Measurement Center. 6) At the end of the 1980s, Osaka Seiki introduced a non-contact tooth surface analyzer FS-35 based on the principle of optical holography, marking the beginning of the non-contact measurement of gears. Next page Single Screw And Barrel For Extruder Zhoushan Dinghai Jinsheng Bimetallic Plastic Machinery Factory (General Partners) , https://www.jinshenggalloy.com
Gear measurement technology for 100 years - review and outlook