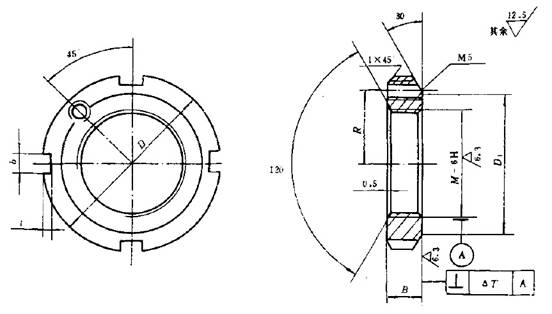
The product drawings in the standard original JB 1700.2-1991 are as follows:

figure 1
As seen from the above figure, the position of the small threaded hole is 45° in the upper left corner; as seen from the cross-sectional view on the right side, the center line of the small threaded hole is perpendicular to the center line of the large threaded hole and has a distance R.
First, in the direction of the small tapped hole of 45°, there is no slot in the middle of the four slots. So the question arises. How can the cross-section of the small thread on the right side and the cross-section of the groove be on one side?
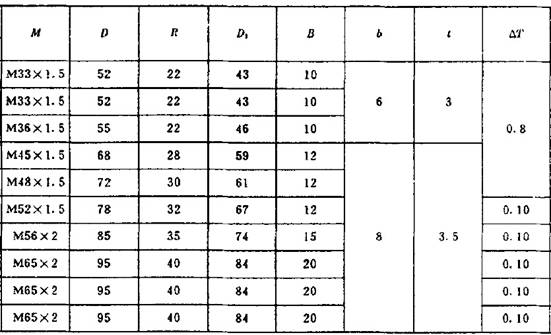
Second, it is a more invisible problem. First look at the identification of each letter in the table data below.

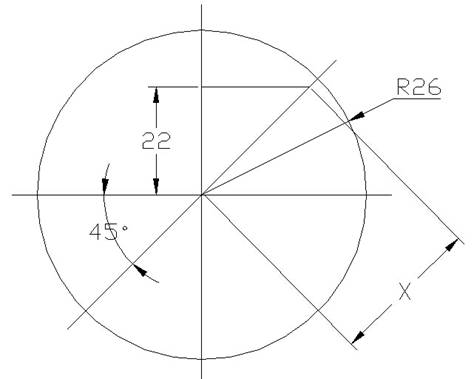
Note that the M33X1.5, the outer circle of the whole product directly D is 52, which means that the radius of the rounding is 26; the centerline of the small threaded hole is perpendicular to the centerline distance R of the large threaded hole is 22; from Fig. 1, small The position of the threaded hole is determined by the R value and the 45° orientation. So we get the following figure 2

figure 2
According to the Pythagorean law, X is 31.11, that is, X is larger than the radius of rectification 26, so the intersection of X and R is on the outer circumference of the circle, that is, the small thread does not exist, but through JB 1700.2-1991, the standard is not found for small threads. Description of the hole.
View JB 1700.2-1991 lock nut through the standard data section of the easy-to-tight fastener network
Http://
Polishing Solid Compound,Aluminum Polishing Compound,Metal Polishing Compound,Stainless Steel Polishing Compound
Jiangmen Gude Polishing Equipment Co., Ltd , https://www.kokipolishing.com