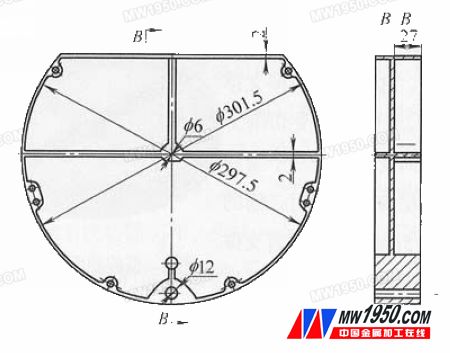
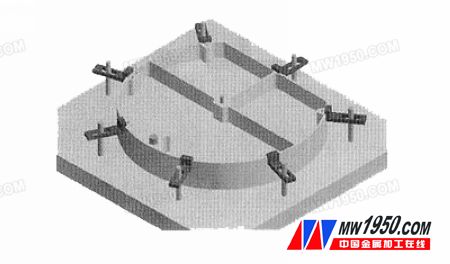
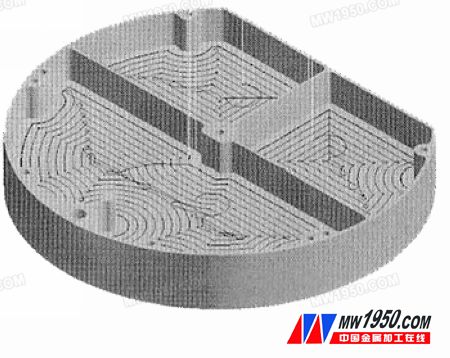
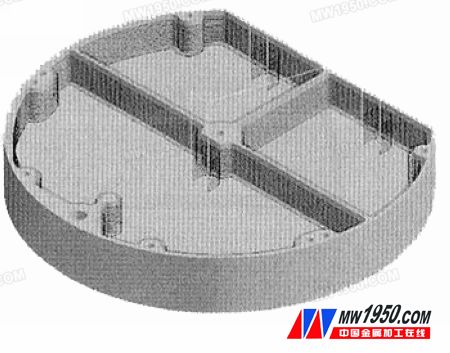
1. Process analysis of CNC machining (1) Structural characteristics of the part The material of the part is hard aluminum LY12, which has good cutting performance and belongs to the typical thin-walled disc structure. The outer dimensions are large, the thickness of the peripheral and internal ribs is only 2mm, and the cavity depth is 27mm. If the process plan or processing parameters are improperly set during the processing, the parts are easily deformed, resulting in an oversize difference. The part structure is shown in Figure 1. figure 1 (2) Process analysis The blank of the part is selected from bar stock, and the roughing and finishing process scheme is adopted. The specific process flow is as follows: blank → rough car → rough milling → aging → fine car → fine milling. Roughing: Reserve 1.5mm finishing allowance on the outer and end faces, and pre-drill the center hole. Rough milling: Reserve a margin of 1.5mm on the side and bottom of the cavity, and pre-drill the process hole at the hole position of φ12mm. Aging: Remove material and processing stress. Finishing car: Finishing end face, outer circle and 镗 process hole φ6mm, requires one-time clamping to complete, in order to ensure the coaxiality, lay a good foundation for the subsequent processing. Finishing: ensuring the final requirements of the part is the focus of this article. 1 roughing cavity roughing is mainly to remove the large margin, and lay the foundation for the subsequent finishing, so when processing the cavity, choose low-cost ordinary CNC milling machine processing. The process requires that the inner contour be machined according to the part structure diagram shown, the arc corner is R5mm, and the finishing allowance is uniform, 1.5mm. Moreover, in this process, it is necessary to pre-process the positioning holes required for finishing in the hole position of φ12 mm. 2 High-speed machining technology for finishing milling cavity is a manufacturing technology applied in recent years. In high-speed machining, the cutting force is small, the machining deformation of the parts can be reduced, and it is suitable for thin-walled parts, and the chips are cut off in a short time. Most of the cutting heat is carried away by the chips, and the workpiece is thermally deformed. Small, it is beneficial to ensure the size and shape accuracy of the parts; high-speed machining can obtain high surface quality, and the processing cycle is also greatly shortened. Therefore, in combination with the characteristics of such thin-walled disk parts, high-speed machining is used for finishing the cavity. 3 Machining of the positioning hole This part is finished with the center hole φ6mm and φ12mm hole as the positioning hole, so it must be machined into place before finishing the cavity. The center hole φ6mm is honed to φ6H8 when the outer circle of the turning precision car is φ301.5mm; the φ12mm hole is drilled by the CNC milling machine and hinged to φ12H8. (3) Positioning and clamping of parts when finishing the cavity In order to make the workpieces can be quickly and correctly clamped on the machine tool, and it is not necessary to align one by one when machining a batch of workpieces, this processing adopts a positioning method of one pin and two pins. . The φ6mm and φ12mm holes already existing on the parts are used as positioning holes for simple tooling. The tooling uses a cylindrical pin and a flat pin as positioning elements. Since the part belongs to a thin-walled part, it is easy to be deformed. When clamping the workpiece, the pressure plate should be pressed at a part with good rigidity of the workpiece, and the distribution should be as uniform as possible to ensure the reliability of the clamping, and the clamping force should be appropriate. In order to prevent the positioning of the workpiece or to cause an unacceptable deformation of the workpiece. The specific positioning and clamping diagram is shown in Figure 2. This clamping method fully conforms to the characteristics of the machining center, and the one-clamp can complete the machining of the cavity and all the holes. figure 2 2. The general scheme of the NC machining program for processing the cavity (1) Programming software The CNC machining program of this part is generated based on the software MasterCAM. The software does not need to draw a solid, just draw the outline to be processed correctly in 1:1, select the appropriate graphics and parameters to generate a program for processing. (2) Selection of equipment The processing cavity is selected from the processing center equipment: Germany HERMLE (Hummer) C1200U, the operating system of the equipment is HEIDENHIN (Hidehan), its performance indicators are: the maximum spindle speed of 18000r/mm, fast moving 30000mm / Min, stroke 1200mm × 1000mm × 800mm, responsive, suitable for high-speed machining. This part has been processed by other machining center equipment before, but because the wall is thin, the thickness of the rib is only 2mm, and the cavity is deep, 27mm. In order to prevent the deformation of the parts, only small-sized tools can be used, and the processing speed is small. Multiple aging, the processing cycle is very long, so this process uses CNC equipment suitable for high-speed machining. (3) Selection of tools According to the material of the parts, the domestically-made insert carbide end mills are selected, double-edged, large helix angle, large space in front of the blade, wear-resistant and low cost. It has been found through practice that the tool is very suitable for high speed machining of aluminum. For the specific parameter selection, it is necessary to explore in the actual cutting, find the appropriate speed, of course, also refer to the manufacturer's information. 3. Machining center fine milling process The milling of the cavity is carried out in two steps, namely bottom and side machining, first bottom and rear side. The center of the NC program is located at the center of the outer circumference of the workpiece, and the safety height is 50 mm above the surface of the part. (1) Surface processing tool specifications: φ14mm end mill is selected. Lower knife mode: The use of a spiral lower knife can improve the cutting state during the feed, maintain a high feed rate and a low cutting load. The way of walking: Select Pocket-Parallel, Spiral, clean Cor-ners (parallel surround and clear angle), from the inside to the outside, the three cavities are processed separately, which can reduce the lifting knife and improve the milling efficiency. When machining, according to the milling method, the machining allowance of 1.5mm on the bottom surface is completed twice, the first knife back is 1.4mm, the tool path overlaps 50%, the speed is 8000r/min, the feed speed is 1400mm/min; during finishing The backing knife amount is 0.1mm, the rotation speed is raised to 12000r/min, the feed is unchanged, and the surface quality of the bottom surface is very good. The path of the tool path is shown in Figure 3. It gradually expands from the inside to the outside. Similar to the shape, the tool path is smooth and soft, so as to minimize the drastic changes, so as not to cause machine vibration. Note: When finishing the bottom surface, a margin of 3mm is reserved for the side to avoid an increase in the amount of knife when milling to the side. image 3 (2) Side machining tool specification: In order to prevent the impact path from changing suddenly at the corner, the impact force is too large. Therefore, the tool with the same corner radius should be avoided during high-speed machining. This time, the φ8mm end mill (corner) is selected. For R5mm). When loading the tool, the tool is shortened as much as possible to ensure the tool strength during high-speed machining. Approaching and retracting methods: Approaching and leaving the workpiece in an arc way can avoid the joint marks generated when the workpiece is suddenly contacted and ensure the surface quality of the parts. Way of walking: Select Contour (shape milling). During processing, the Z-axis is layered and carried out in a down-cut manner. The speed is 10000 r/min and the feed rate is 1000 mm/min. The three cavities are simultaneously milled down layer by layer, and the amount of back-feeding is 2 mm. Note: It is not possible to mill the next cavity after milling in one pocket. Because, when the first cavity is finished, the wall thickness of the inner rib is only 3.5mm, and when the next cavity is machined, the cutting amount of the inner rib will be 1.5mm, which will cause the local support force to become smaller, the workpiece It is easily deformed by the influence of cutting force; if the three cavities are milled down layer by layer at the same time, the wall thickness of the rib is 5 mm, and the supporting force is relatively large. The machining path of the tool is shown in Figure 4. Figure 4 After the machining operation is completed, select HEIDENHIN post processing to generate the NC program and transfer it to the machine with a network cable. 4 Conclusion The part is processed in this way, which not only guarantees the processing quality, but also shortens the production cycle by half compared with the traditional CNC machining, which greatly improves the production efficiency. This paper can also provide some reference for the peer processing of similar parts. Refractory anchoring brick refers to have a specific shape in the industrial kiln shell or support the lining of the steel structure installed, and buried in the refractory lining of its anchoring and linking role of clay, high alumina and other refractory bricks. It has the characteristics of high strength, good resistance to scouring and high resistance to spalling. Anchor brick for heating furnace,Coal chemical kiln anchoring bricks,Refractory anchoring bricks for heating furnac Huixian Xinwei Refractories Co. , https://www.xinweirefractory.com


Process plan and numerical control machining process of typical thin-walled disc parts